Saturday, November 29, 2014

Sugary Sweet Holiday Treats


A white blanket of snow on the ground, lights twinkling on the trees, chimneys lit, and the crisp chill in the air. With the first signs of wintertime, life instantly fills with joy, after all, it is the most wonderful time of the year! The holidays are meant for getting together with family and friends, opening presents, and feasting on life's happiness. Personally, one of my favorite parts of the holidays are the flavors and the treats that come along with it. Whether it is peppermint bark, truffles, cake pops, or Rice Krispie treats, these delicious goodies can be wrapped up for homemade gifts or just enjoyed on their own! So let's jingle on into the holidays and sled down to the kitchen because these treats are all I want for Christmas (and all that you are going to want, too!)

Peppermint bark is one of those items that once December hits, it appears everywhere, and I most certainly do not have a problem with that! It's super easy to make and only requires four ingredients. To make peppermint bark, start by melting your bittersweet chocolate in a double boiler. A double boiler is simply a pot of boiling water with a bowl on top covering the opening. This ensures that your chocolate melts evenly and doesn't burn. When the chocolate is melted, it should be smooth and oh so dreamy! To the chocolate, add a couple drops of peppermint extract. Always remember with extracts that a little goes a long way because the flavor is so concentrated. Stir the chocolate so it is all incorporated and spread it into a thin layer on a baking sheet lined with parchment paper. Place the whole sheet into the fridge until the chocolate is hard. In the mean time, you can start working on the next layer which is simply melted white chocolate. Do the same thing that you did with the bittersweet chocolate by melting it in a double boiler, but this time, do not add the peppermint extract or the flavor will be too intense. Even I don’t like the flavor, and I love mint! Layer the white chocolate onto the bittersweet chocolate and rather than refrigerating this, instantaneously add crushed peppermint onto the top because the chocolate is still warm so it will stick. Once covered, chill until the bark is completely hardened. Then, break it up into small pieces, and you're ready to enjoy! To make this gift worthy, I like to pile the bark into a holiday themed cellophane bag and tie the top with some festive ribbon! Just remember to refrigerate the bark until you give it out because it's the best when it doesn't turn into a melted mess. With one bite of peppermint bark, it's easy to instantly get into the spirit of the holidays!
The next treat sure to bring joy to your holiday table is chocolate truffles. A basic chocolate truffle is something that you can make 45 times and no one will ever get tired of because you can constantly switch them up by adding different flavors inside or rolling them in different toppings. To make the chocolate base, combine chopped semisweet chocolate and heavy cream in a double boiler. Then put this in the refrigerator to harden for about an hour. Once hardened, this is your time to add flavorings to the inside of your truffle. Some ingredients to add include raspberry jelly, peanut butter, peppermint extract, and almond extract. Roll the mixture into balls about an inch in diameter. Then refrigerate again until the truffles are chilled. Once cold, dip the truffles into any type of chocolate that you would like. You can use white, dark, milk, or even festively colored chocolate wafers. Still warm from the melted chocolate, now is the fun part: the decorating! Roll the truffles in an array of toppings such as coconut (it looks like a snowball when you do this!), chopped nuts, crushed cookies, or sprinkles. You can also decorate them by piping on icing decorations with a piping bag. These truffles are decadent, rich, and incredibly sweet. You only need one to be satisfied, but hey, go ahead and eat the whole batch if you want. To present these as a gift, I suggest purchasing a decorative tin and layering the truffles, each layer separated by wax paper so they don't stick. Close the tin, and voila, you've got an instant gift that can satisfy any and all tastes.

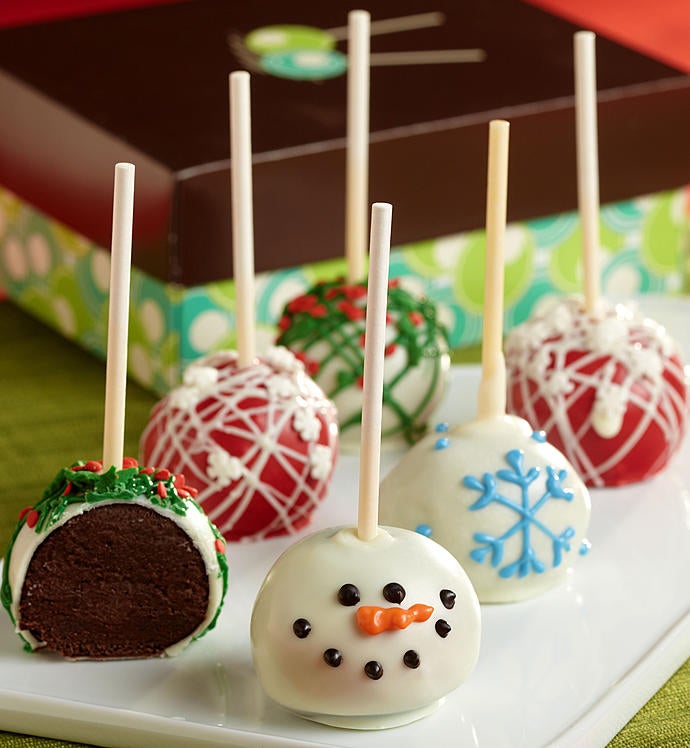
Nothing is more versatile and more adjustable for any holiday or occasion than cake pops. They not only look good, but cake pops are easy to make and absolutely addicting. Start off by making your favorite cake or brownie recipe. The possibilities are endless from favorites like chocolate or vanilla to something different such as red velvet, carrot cake, or lemon. For a festive twist, try gingerbread cake! Crumble your batch of cake or brownie into crumbs. I know, you may be thinking “why ruin a perfectly good batch of deliciousness?”, but trust me, it'll all work out. Mix the crumbs with icing (chocolate or vanilla works best), and place into the refrigerator until hardened. Use an ice cream scoop to ensure that each pop is equal in size and start rolling. Place the cake/ brownie pops onto a baking sheet lined with parchment paper and stick a lollipop stick (you can find these at the supermarket or a craft store) into each one. Refrigerate once more, and then dip in melted chocolate, and decorate with sprinkles or colored sugar. To present as a gift, cover a block of Styrofoam with wrapping paper so that you can gently stick the lollipops in place, and they won't shuffle around as you're driving. Wrap the entire stand in clear cellophane and tie off with a ribbon. The presentation alone is enough to win people over, but once they taste these cake/brownie pops, they're sure to love the delicate cake and icing all wrapped in a pretty little package! Gingerbread Cake Recipe

The last holiday treat to bring about all the festive cheer is none other than a play on the classic Rice Krispie treat! Start off by simply making a batch of these delicious bundles of joy. To put a twist on it, try using the chocolate version for some extra decadence. Spread the mixture onto a baking sheet in a thin layer, and let cool until firm. Then, you can start decorating. Cut the Rice Krispie treats into shapes using cookie cutters. Try a mitten, a Christmas tree, a snowflake, a Jewish star, a candy cane, or a gingerbread man. They're all super cute and are an easy way to make something plain something extraordinary with just the twist of the wrist. Once you have all of your shapes cut out, you can start to decorate the Rice Krispie treats using colored icing or melted chocolate to attach crushed peppermints, m&ms, marshmallows, or sprinkles. For an idea sure to wow, make chocolate Rice Krispie treats, use chocolate chips and a red m&m for the face, and attach pretzels as antlers to make Rudolph!  As a gift, I suggest buying a decorative cardboard candy box, layering in the Rice Krispie treats between sheets of wax paper, and sealing the box with a bow. These Rice Krispie treats are fun, festive, and fabulous. They're also super sticky so be careful!

The holidays aren't complete without sugary treats that you can indulge on all season long. From peppermint bark and chocolate truffles to cake/brownie pops and Rice Krispie treats, all of your favorite goodies can be packaged up and given out to all of your friends and family. Even someone as grumpy as the Grinch won't be able to pass up these treats. Just think, you can bring all of the holiday spirit right into your home when you’re Cooking with Carly!


Thursday, November 13, 2014

Winning Game Day Eats

There's nothing that defines fall/winter Sundays more than football. It's an American favorite for inviting friends over, dressing up in team jerseys, and most importantly, watching the game while munching on those addicting game day treats. On the menu are appetizer style dishes to satisfy a crowd. We start at the kickoff with pepperoni pizza dip, then move down to classic hot wings with homemade blue cheese dressing, a serving meant for a linebacker of loaded nachos with homemade pico de gallo and guacamole, and to end the game, a fizzy, colorful drink. So take a seat on the couch, turn the TV on, and sit back because we're going to score a touchdown with this menu!

Pepperoni pizza dip is a spin on the typical slice of pizza that is oh-so -delicious but could always use a fun twist. Start out by making the cream mixture. In a bowl, you want to combine cream cheese, sour cream, dried oregano, garlic powder, and a sprinkle of ground red pepper flakes. Once all mixed together, spread into a greased pie plate. Then on top of this layer, spoon on a thin layer of tomato sauce. For the next layer, add some chopped up pepperoni slices. You can really add any topping that you want such as black olives, peppers, or onions. Place the dish in the oven at 350 degrees for ten minutes. After the ten minutes, take the pan out of the oven and add a layer of mozzarella cheese. Put it back into the oven for about 10 minutes or until the cheese is melted like a blanket over your delicious dip. Serve with crackers, tortilla chips, or cubes of Italian bread. This dip has all the elements of a great pizza: ooey gooey cheese, the fresh zip from tomato sauce, and all of the best pizza toppings. Just be careful, it's easy to eat the whole thing without even knowing it!

The next classic American food is none other than hot wings. This is a simple and abbreviated version served with homemade blue cheese dressing. Take you chicken legs and wings and place them on a baking sheet. Generously season them with salt and pepper. Broil under the oven for about half an hour or until the skin is crispy and golden brown. Now, put them in a large bowl and toss with wing sauce. Once all wings are coated, place them on a platter with some carrots and celery and the best friend to the chicken wing, some blue cheese dressing. You can always use pre-made dressing from the bottle, but to make it yourself, stir together sour cream, milk, mayonnaise, Worcestershire sauce for a savory hint, vinegar to add some tang, salt, pepper, and of course, blue cheese! These wings are the victory dance to your football party.
Everyone loves a great wing, and with the crispy skin, spicy sauce, and blue cheese dressing, you're sure to satisfy everyone with this messy but delicious item. For those of your friends who are not as much into spicy food, you can mix this recipe up by simply tossing that wings in a different sauce. Try lemon garlic pepper, sticky honey mustard, Asian teriyaki, or barbecue. Wing Sauce Recipe

To round out the menu, nothing will satisfy a group of football watchers more than a heaping batch of nachos. These are very customizable so you can really add anything that you want. I suggest starting off by cooking your taco meat in a skillet on the stove. Start out with ground beef, break it into small pieces, and add some taco seasoning. For an option other than meat, you can use chopped up chicken with the same seasoning mixture. Once your meat if fully cooked, layer it onto
your tortilla chips. These can be of any variety: blue corn, white, yellow, or even lime flavored chips! A helpful hint for the assembly of your loaded nachos is to assemble them close to the time of your party so that way the chips don't get soggy sitting out. On top of your nachos, sprinkle on shredded cheese such as cheddar, mozzarella, Colby jack, or a combination of the three. Stick the whole platter in the oven for about 5 minutes or until the cheese is melted. Now, the fun part, the toppings! You can add anything from tomatoes to lettuce to sour cream to olives to hot sauce to nacho cheese. But here, I have two classic nacho toppers: pico de gallo and guacamole.

Pico de gallo is a chopped up, fresh salsa that is a staple at all Mexican restaurants. To make this topping, dice tomatoes, red onion (add however much you want, depending on how strong you want the onion flavor to be), jalapeño (take the seeds out if you want it to not be as spicy), and cilantro which adds a kick of freshness. Stir this all together with the juice of one lime and salt to taste. Pico de gallo instantly adds a burst of brightness to the nachos.

The second topping for the nachos is everyone's favorite guacamole. Simply mash together ripened avocados and diced tomato. Add like juice and salt. Just like that, you have a decadent and oh-so-easy topping. If you plan on refrigerating the guacamole, add a little more line juice than you normally would because the acid helps prevent the guacamole from turning brown. Also, press the plastic wrap directly onto the surface of the guacamole rather than straight across the top of the bowl; this will eliminate air that can turn it brown.
To end the meal, I like to make a fun drink that everyone can enjoy. In a big pitcher, stir an entire bottle of lemon lime soda (Sprite), a jar of maraschino cherries including he juice, and circular slices of lime. And that's it! An easy drink that both kids and adults will love.

So look at that. You're able to make pizza dip, wings with homemade blue cheese dressing, nachos, pico de gallo, and guacamole, and a fun drink all whole enjoying the football game. It's always easy to win when you're Cooking with Carly!