At this time of year, we are surrounded by Fall: the sight
of amber colored leaves, the chill that makes you put on a sweater, the fireplaces
lit for warmth, and most importantly, the tastes of comfort. Fall is a time of
hot, hearty dishes that will fill you up and leave you satisfied as you enjoy
all that the season has to offer. On the menu are seasonal favorites including
cranberry appetizers, sweet potato fries with a spicy dipping sauce, pumpkin
cupcakes with cream cheese icing, and an apple cider spritzer. Fall is the perfect
time to cook and bake with produce straight from the harvest that will only be
here for a short amount of time, so let’s beat the Falling leaves and get
cooking!

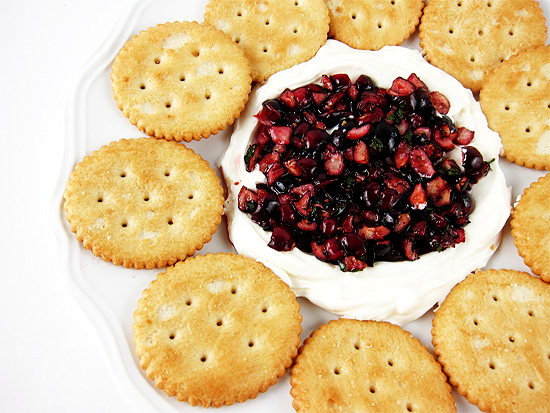 First up are two appetizers that utilize cranberries, an
ingredient commonly used this time of the year. First up is a cream cheese
cranberry dip perfect served alongside crackers, chips, or pretzels at your
next gathering. To make the dip, add softened cream cheese, orange juice and
orange zest to add a zip of freshness, and a dash of cinnamon to a food
processor. Once this is combined, you want to mix in some dried cranberries so
that they don’t break apart while you mixed the other ingredients. Store this
dip in the refrigerator, and eat whenever you want (it’s perfect for a snack,
lunch, or even breakfast)! The next cranberry appetizer that I cannot get enough
of are cranberry brie bites. These are legitimately so addictive, so take
caution! Not only are these delicious, but they are super simple and can be
made in a flash. There are only three ingredients (yes, you read that right!).
You want to start out with the phyllo dough shells which can be found in the
freezer section of your supermarket. Then, you want to spoon about half a
teaspoon of cranberry sauce into the middle of each cup or enough to fill the
cup about half way. On top of the cranberry sauce, add some cubes of sliced
brie, my all-time favorite cheese. Pop in the oven for five minutes on 350
degrees, and you will have the perfect appetizer that can just be popped in
your mouth and enjoyed. Seriously though, be careful!!!
First up are two appetizers that utilize cranberries, an
ingredient commonly used this time of the year. First up is a cream cheese
cranberry dip perfect served alongside crackers, chips, or pretzels at your
next gathering. To make the dip, add softened cream cheese, orange juice and
orange zest to add a zip of freshness, and a dash of cinnamon to a food
processor. Once this is combined, you want to mix in some dried cranberries so
that they don’t break apart while you mixed the other ingredients. Store this
dip in the refrigerator, and eat whenever you want (it’s perfect for a snack,
lunch, or even breakfast)! The next cranberry appetizer that I cannot get enough
of are cranberry brie bites. These are legitimately so addictive, so take
caution! Not only are these delicious, but they are super simple and can be
made in a flash. There are only three ingredients (yes, you read that right!).
You want to start out with the phyllo dough shells which can be found in the
freezer section of your supermarket. Then, you want to spoon about half a
teaspoon of cranberry sauce into the middle of each cup or enough to fill the
cup about half way. On top of the cranberry sauce, add some cubes of sliced
brie, my all-time favorite cheese. Pop in the oven for five minutes on 350
degrees, and you will have the perfect appetizer that can just be popped in
your mouth and enjoyed. Seriously though, be careful!!! The next Fall favorite that we will be cooking up are sweet
potato fries. Recently, these have become a lot more popular because they are a
healthier option compared to regular fries. Sweet potatoes are also an item
specifically harvested in Fall, so you want to take advantage of these now. To
make the fries, you want to start out by slicing your sweet potato into thin
strips and arranging them onto a greased baking sheet. Sprinkle a bit of salt
on top, and bake for 20 minutes in the oven at 450 degrees. Let cool, and get
started on the dipping sauce, because we all know that every good fry must have
something to be dipped in. Start out with a little bit of mayonnaise, then add
a sprinkle (or depending on how spicy you want it) of cayenne pepper, a squeeze
of lemon juice, and finish with a dash of salt. These are perfect served
alongside a meal or just by themselves as a snack.
The next Fall favorite that we will be cooking up are sweet
potato fries. Recently, these have become a lot more popular because they are a
healthier option compared to regular fries. Sweet potatoes are also an item
specifically harvested in Fall, so you want to take advantage of these now. To
make the fries, you want to start out by slicing your sweet potato into thin
strips and arranging them onto a greased baking sheet. Sprinkle a bit of salt
on top, and bake for 20 minutes in the oven at 450 degrees. Let cool, and get
started on the dipping sauce, because we all know that every good fry must have
something to be dipped in. Start out with a little bit of mayonnaise, then add
a sprinkle (or depending on how spicy you want it) of cayenne pepper, a squeeze
of lemon juice, and finish with a dash of salt. These are perfect served
alongside a meal or just by themselves as a snack. 
Now a Fall food blog would be nothing without something
pumpkin, so the next treat that we will be making are mix and match pumpkin
cupcakes with cream cheese icing. I say mix and match because I take two
recipes, one for the cake part and one for the icing and put them together to
make a truly decadent Fall delight. Once you spread the icing onto the
cupcakes, you can top them with chocolate chips, colored sprinkles, candy corn,
or any other Halloween candy. You can also make these really festive by using
specialty Halloween wrappers with decorations to make these fun to look at and
even more fun to eat. Pumpkin Cupcake Recipe Cream Cheese Icing Recipe
 The last seasonal Fall favorite for this blog is a chilled
apple cider spritzer. Apples are a great Fall harvest food because they are
super versatile and can be used in basically everything from apple pie to
applesauce to apple fritters to apple cake to apple doughnuts…I think you get
the point! You can even go to a farm and pick apples yourself. This season, I
went with my family, and we ended up picking more than 21 pounds of apples. To
make this drink, you want to start with some of your favorite chilled apple
cider. To that, you’re going to add some cranberry juice, orange juice,
cinnamon sticks, and some seltzer to add some bubble and fizz to the drink.
After you stir the drink together, remove the cinnamon sticks. Serve in a big
pitcher with ice and some orange peels for presentation.
The last seasonal Fall favorite for this blog is a chilled
apple cider spritzer. Apples are a great Fall harvest food because they are
super versatile and can be used in basically everything from apple pie to
applesauce to apple fritters to apple cake to apple doughnuts…I think you get
the point! You can even go to a farm and pick apples yourself. This season, I
went with my family, and we ended up picking more than 21 pounds of apples. To
make this drink, you want to start with some of your favorite chilled apple
cider. To that, you’re going to add some cranberry juice, orange juice,
cinnamon sticks, and some seltzer to add some bubble and fizz to the drink.
After you stir the drink together, remove the cinnamon sticks. Serve in a big
pitcher with ice and some orange peels for presentation.
The harvest has brought us some treats that fall straight
from the farm to table within seconds. We’ve got cranberry orange dip, cranberry
cups, sweet potato fries, pumpkin cupcakes with icing, and an apple cider
spritzer sure to please. With the leaves on the ground and Fall spirit in the
air, you can whip up all of these delicious seasonal favorites, all when you’re
Cooking with Carly!